French doors and sliding doors are the two most popular patio door choices for Los Angeles homes. Both connect indoor living spaces to outdoor areas, let in natural light, and come in a wide range of materials and finishes. The right choice depends on your floor plan, home style, budget, and how you use the space. This guide covers every factor so you can make a confident decision.
At Fusion Windows and Doors, we install both door types across Los Angeles and surrounding communities. Here’s an honest comparison of what each delivers.
French Doors vs. Sliding Doors at a Glance
| Factor | French Doors | Sliding Doors |
|---|---|---|
| Opening mechanism | Hinged, swing in or out | Track-based, glide left or right |
| Space required | Needs swing clearance | Minimal floor space |
| Max opening width | Typically up to 8 feet | Up to 16 feet or more |
| Glass area | Divided panes | Large uninterrupted panels |
| Aesthetic | Classic, traditional | Modern, contemporary |
| Energy efficiency | Good with proper sealing | Good to excellent |
| Security | Strong with multi-point locks | Strong with modern locking systems |
| Maintenance | Hinges and weatherstripping | Tracks and rollers |
| Cost range installed | $2,000 to $5,000 | $1,500 to $6,000+ |
| Best for | Traditional homes, wide openings, formal spaces | Contemporary homes, tight spaces, large views |
How French Doors and Sliding Doors Actually Work
French doors are hinged at the sides and swing open from the center. They typically come as a pair of panels, each attached to opposite sides of the frame. Both panels can open fully, which creates a wide unobstructed passageway between indoor and outdoor spaces.
They swing either inward into the room or outward onto the patio. The direction matters for floor plan planning, since one side will always require clearance when the doors are open.
Sliding doors use one or more panels that glide horizontally along a track. One panel is usually fixed while the other moves. Multi-panel systems can include two, three, four, or more panels, with some spanning openings of 16 feet or wider.
Because the panels move parallel to the wall, sliding doors need no floor clearance on either side. That’s their core space advantage over French doors.
Sliding French doors are a third option worth knowing about. They combine the divided lite glass design of traditional French doors with the track-based operation of sliding doors. They’re a practical choice for homeowners who want the classic French door look but don’t have the swing clearance. Panel counts run from two to four, and widths can reach 16 feet.
How Each Door Type Handles Space and Floor Plan Constraints
French doors need swing clearance. A standard pair requires roughly 3 to 4 feet of clear floor space on whichever side they open toward. That limits furniture placement near the opening and can be a real problem on smaller patios or in compact rooms.
Sliding doors solve this completely. The panels move along the wall and don’t encroach on floor space in either direction. For LA homes with narrow side yards, compact patios, or open-plan layouts where furniture sits close to the door, sliding doors are the more practical choice.
One consideration for sliding doors is the fixed panel. When a sliding door is open, roughly half the total width is blocked by the stationary glass. French doors open fully across their entire width, which gives better physical access between spaces when both panels are swung open.
For door installation in tight spaces or where maximizing usable floor area matters, sliding doors almost always work better. For homes with generous patio space and formal entertaining areas, French doors create a wider, more dramatic passageway.
Natural Light and Outdoor Views: How Each Door Performs
Sliding doors typically offer better unobstructed views. Their large single-pane glass panels create a picture-frame effect that frames the garden or patio with minimal visual interruption. When the door is closed, the view is nearly the same as when it’s open.
French doors use divided glass panes separated by muntins, which are the horizontal and vertical bars that create the classic multi-pane grid pattern. This adds character and suits traditional architecture, but the muntins do interrupt sightlines compared to a large sliding panel.
For Southern California homes positioned to take advantage of canyon views, ocean outlooks, or pool areas, sliding doors maximize the connection between indoors and outdoors. For homes where the aesthetic character of the door itself is the priority over the view beyond it, French doors deliver more visual interest in the door frame.
Both door types bring substantial natural light into the room. The difference in light volume between them is minimal. What differs is the quality of the view and the visual character of the opening.
Which Door Style Suits Your Home’s Architecture
This is the factor most guides skip entirely. In Los Angeles, home architecture varies dramatically by neighborhood, and the right door choice follows from the home’s style.
| LA Home Style | Neighborhoods | Recommended Door |
|---|---|---|
| Spanish Colonial Revival | Hancock Park, Beverly Grove, Windsor Square | French doors with arched transoms, dark iron hardware |
| Craftsman Bungalow | Pasadena, Highland Park, South Pasadena | French doors with divided lite glass, wood or fiberglass |
| Mid-Century Modern | Los Feliz, Hollywood Hills, Encino | Slim-profile sliding doors, minimal frame |
| Contemporary / New Build | Malibu, Pacific Palisades, Bel Air | Large-format sliding or pocket systems |
| Ranch Style | San Fernando Valley, Culver City, Mar Vista | Either; sliding doors suit open-plan layouts |
| Mediterranean Revival | Manhattan Beach, Redondo Beach | French doors or wide sliding systems |
| Victorian | Angelino Heights, Carroll Avenue | French doors with decorative glass and period hardware |
French doors have been part of Southern California’s residential architecture for over a century. They suit the formal character of Spanish Colonial Revival and Mediterranean homes across established LA neighborhoods. Sliding doors align naturally with the clean lines and glass-forward design of mid-century modern and contemporary builds.
For a broader look at door styles by home type, our front door styles guide covers the full range of exterior door options and how to match them to your home’s architecture.
Energy Efficiency and Title 24 Compliance for Both Door Types
Both French and sliding doors achieve strong energy performance when properly specified. The glass package, including Low-E coating, dual or triple pane construction, and argon fill, has a greater impact on efficiency than the door type itself.
The main efficiency consideration specific to door type is the seal.
French doors have a center seam where the two panels meet when closed. On lower-quality products, this seam is a potential air leakage point. Quality French doors use compression seals and multi-point locking systems that press both panels tightly against the frame when locked, largely resolving this issue.
Sliding doors can develop air leakage along the bottom track over time as the track seal wears. Annual track cleaning and periodic seal inspection keeps this under control.
For California homeowners, the more pressing question is Title 24 compliance. Any permitted door installation in most Southern California climate zones must meet a maximum U-factor of 0.30 and SHGC of 0.23. Both French and sliding doors can meet these requirements when specified with the right glass. Compliance depends on the complete door assembly, not the door type alone.
For more on what these ratings mean and how they affect your home’s performance, our guide to the best energy efficient windows for hot climates covers the full picture.
Security Features on French Doors vs. Sliding Doors
The old assumption that sliding doors are less secure than French doors is outdated. Modern versions of both types offer strong security when specified correctly.
French doors use multi-point locking systems that engage at multiple points along the vertical edge of the door frame. Better quality systems also include shoot bolts at the top and bottom of each panel. The divided lite glass panes are smaller than a sliding door’s large panel, which makes glass-break entry slightly harder.
Sliding doors traditionally used single-point hook locks, which were a genuine weakness. Modern sliding doors use multi-point locking systems comparable to French doors, combined with anti-lift hardware that prevents the panel from being lifted off the track. Premium systems from brands like Fleetwood and LaCantina include laminated glass as standard, which resists forced entry far better than standard tempered glass.
For both door types, the most important security factor is installation quality. A premium door installed incorrectly is less secure than a standard door installed properly. This is one reason why working with a licensed, experienced installer matters as much as product selection.
Maintenance Requirements for Each Door Type
Both door types are manageable with regular attention to their specific moving parts.
French door maintenance:
- Oil hinges annually to prevent binding and squeaking
- Inspect and replace weatherstripping every few years
- Check center seam seals for wear, especially after hot summers
- Clean glass with mild detergent and soft cloth
- Coastal properties need more frequent hardware inspection for salt air corrosion
Sliding door maintenance:
- Clean tracks regularly with a vacuum and damp cloth to prevent debris buildup
- Apply silicone spray to tracks twice a year for smooth operation
- Inspect rollers annually and replace when the door becomes difficult to slide
- Check bottom track seals each year and replace when worn
- Coastal properties need frequent track and roller inspection
For both door types, checking for condensation between glass panes is worth doing annually. Fogging between panes means the seal has failed and the unit needs replacing. Our guide on condensation on windows covers what causes seal failure and when replacement is necessary.
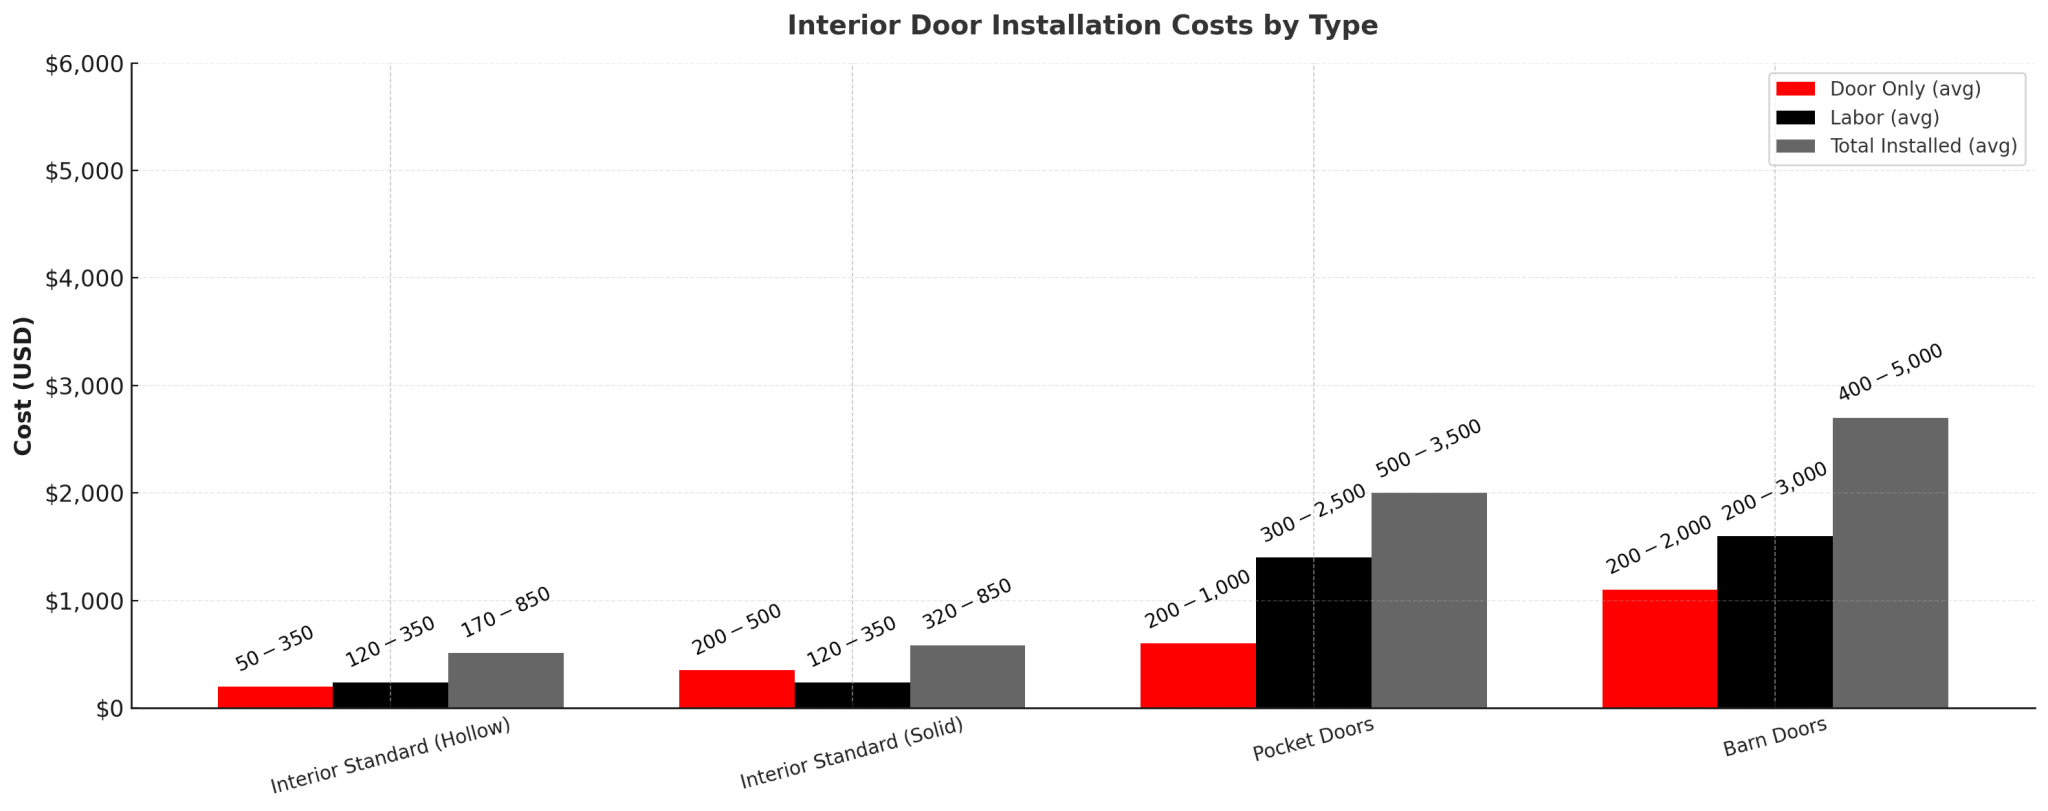
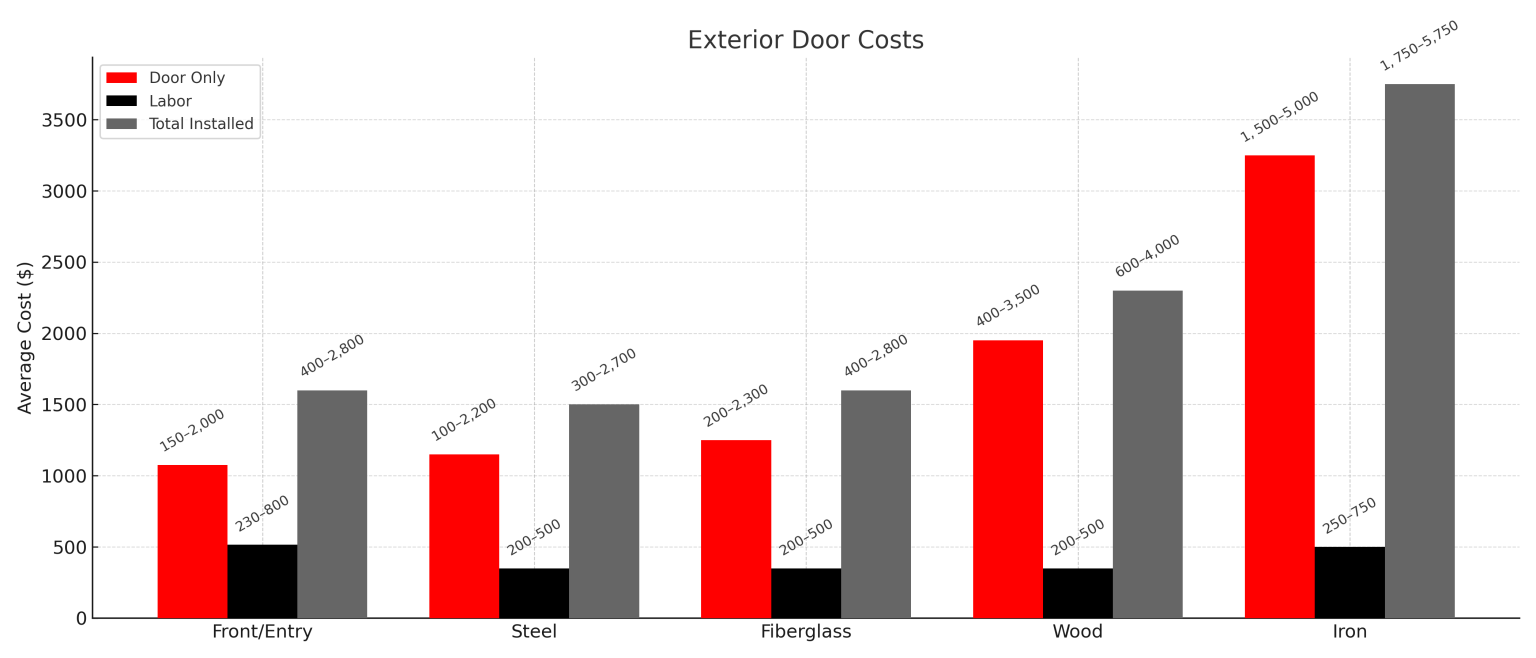
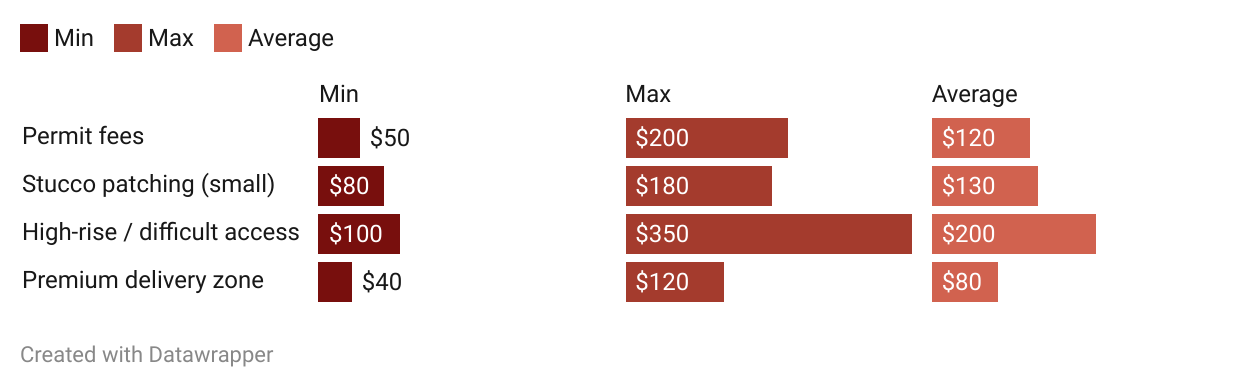
Cost Comparison: French Doors vs. Sliding Doors in Los Angeles
Costs vary based on material, size, panel count, glass specification, and brand. These ranges reflect typical Los Angeles project costs including installation.
| Door Type | Cost Range Installed |
| Standard French door pair (fiberglass or vinyl) | $2,000 to $5,000 |
| Premium French door pair (aluminum or wood) | $4,000 to $12,000 |
| Standard sliding door (2-panel, vinyl) | $1,500 to $5,000 |
| Mid-range sliding door (2-panel, aluminum) | $3,000 to $9,000 |
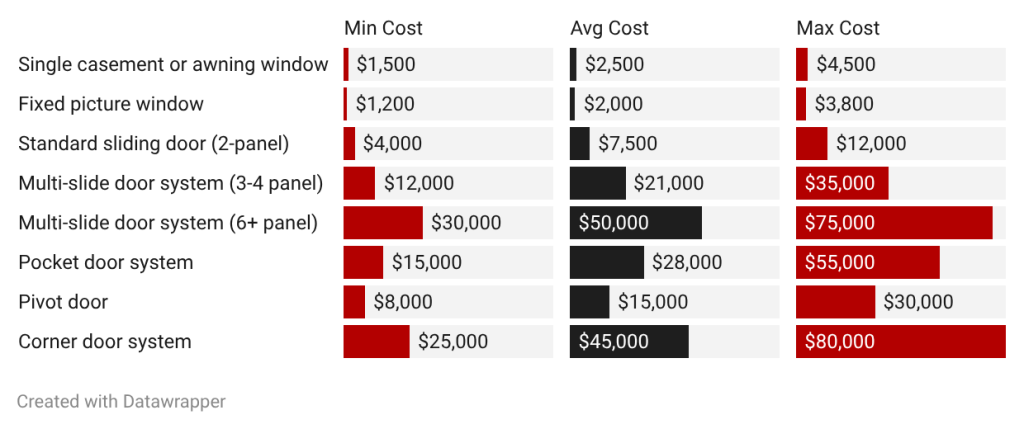
| Large multi-slide system (4-panel) | $8,000 to $35,000 |
| Sliding French door (2-panel) | $2,500 to $7,000 |
Standard French door pairs are generally comparable in cost to standard sliding doors at the entry level. The gap widens at the premium end, where large-format multi-slide systems cost significantly more than any French door configuration.
Los Angeles labor rates sit above the national average, pushing all figures toward the higher end of these ranges. For a full breakdown of what drives door installation costs in the LA market, our door installation cost guide covers every variable in detail.
Choosing Between French Doors and Sliding Doors: by Situation
| Your Situation | Recommended Door | Reason |
| Tight patio or small outdoor space | Sliding | No swing clearance needed |
| Contemporary or MCM home | Sliding | Clean lines, uninterrupted glass |
| Spanish Colonial or Craftsman home | French | Matches traditional architectural character |
| Large opening, 10 feet or wider | Sliding (multi-panel) | French doors max out around 8 feet |
| Formal entertaining space | French | Wide opening, dramatic passageway |
| Want French look without swing clearance | Sliding French doors | Best of both options |
| Coastal property | Either with proper materials | Frame material and glass spec matter more than door type |
| Budget priority | Sliding (standard) | Lower starting cost than French |
| Long-term home value focus | Either | Both add value; style match to home matters most |
For more on how door upgrades affect resale value in the LA market, our guide on do new windows increase home value covers what buyers and appraisers actually look for.
Frequently Asked Questions About French Doors vs. Sliding Doors
Which Door Type Adds More Value to a Los Angeles Home?
Both add value when they suit the home’s architecture and are installed correctly. French doors tend to add more perceived value on traditional homes in established neighborhoods like Hancock Park and Pasadena, where the style fits the property. Sliding doors, particularly large-format multi-panel systems, add more value on contemporary builds where they’re an architectural feature rather than just a functional element. Style match matters more than door type.
Are Sliding Doors Less Secure Than French Doors?
Not with modern products. The security gap between sliding and French doors closed significantly over the past decade. Both types now offer multi-point locking systems, anti-lift hardware, and optional laminated glass. The quality of the product and the installation matters far more than whether it slides or swings.
What Are Sliding French Doors and When Should I Choose Them?
Sliding French doors combine the divided lite glass design of traditional French doors with a track-based sliding mechanism. They suit homeowners who want the classic French door aesthetic but don’t have the floor clearance for a swinging door. They’re available in two to four panel configurations and can span openings up to 16 feet. If the French door look matters but the swing space doesn’t exist, this is the right specification.
Which Door Is Better for a Small Patio or Balcony?
Sliding doors. They require no swing clearance and don’t encroach on the patio or the interior floor space when open. French doors need 3 to 4 feet of clearance on whichever side they open toward, which is a real constraint on compact patios, narrow side yards, and balcony applications. For any space-constrained opening, sliding doors are the practical choice.
How Long Do French Doors and Sliding Doors Last in Southern California?
Quality aluminum or fiberglass French and sliding doors last 25 to 40 years with proper maintenance. Coastal properties face accelerated wear from salt air, particularly on hardware and track components. Annual maintenance, including hinge oiling on French doors and track cleaning on sliding doors, extends service life considerably. For a full breakdown of what affects door and window lifespan in Southern California’s climate, our types of doors guide covers materials and longevity in detail.
At Fusion Windows and Doors, we carry French doors, sliding doors, and sliding French door systems from Andersen, Marvin, Fleetwood, LaCantina, and other leading brands. Our team installs across Los Angeles and surrounding communities. If you’re ready to choose the right door for your home, get a free quote and we’ll bring samples, assess your opening, and walk you through the right specification.