
You don’t need to be an installer to measure your own windows and doors. You need a tape measure, ten minutes per opening, and one rule that most homeowners get wrong: you measure the opening, not the old window sitting in it.
That distinction is the difference between a quote that holds and a quote that changes after the field measure. This guide walks through exactly how to take the numbers, what to do when an opening isn’t square, and where doors need two measurements that windows don’t.
A quick note on why you’d bother: accurate numbers up front mean the estimate you get is close to the price you pay, and they let us pull realistic product options before anyone visits. They are not the numbers we build from. Every order Fusion places is confirmed by a professional field measure first. More on that at the end.
What you need before you start
- A steel tape measure (fabric tapes stretch and will cost you an eighth of an inch)
- A helper if you can get one, so one person reads and one person writes
- A notepad or phone, and a camera
- A level, if you have one
Work from inside the home for everything. Interior measurements are what manufacturers build to, and they’re far easier to take accurately than reaching over shrubs and stucco.
Label every opening as you go: “Primary bedroom, north wall, double hung.” On a whole-house project you will lose track by opening six, and a page of orphaned numbers is worse than no numbers at all.
How to measure for replacement windows
1. Measure the width, three times
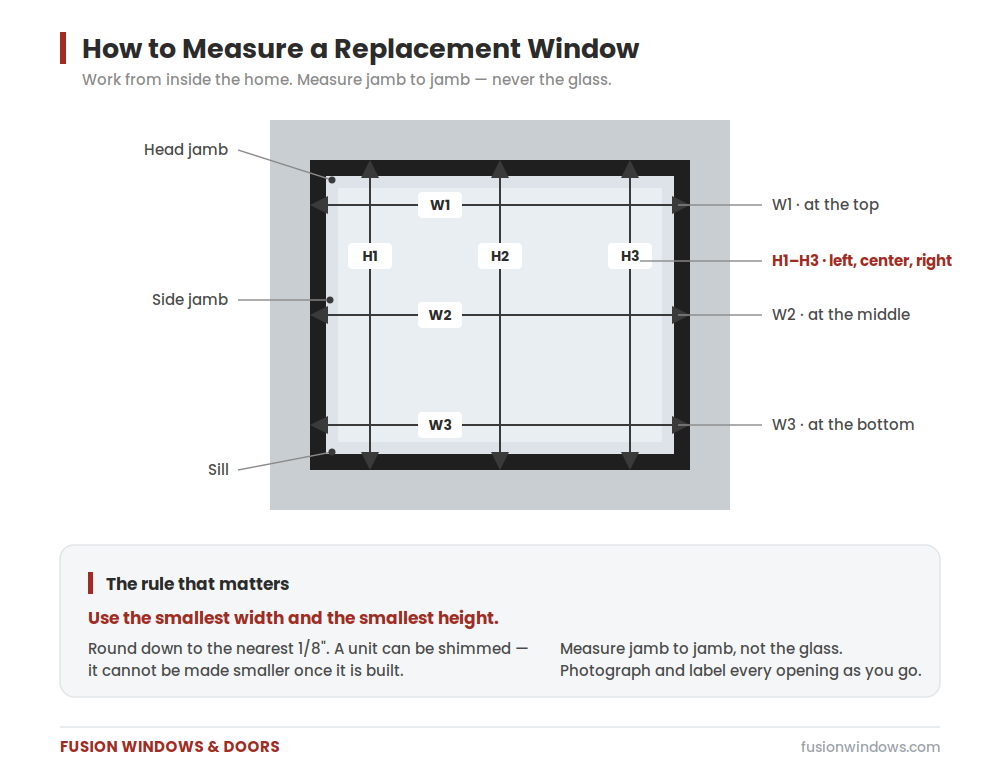
Measure from the inside face of one side jamb across to the inside face of the other. Do it three times: once near the top, once at the middle, once near the bottom.
The side jambs are the vertical surfaces that form the opening. If your window is finished with drywall returns instead of wood jambs, measure drywall to drywall.
Do not measure the glass. The glass is smaller than the sash, the sash is smaller than the frame, and the frame is smaller than the opening. Measuring glass is the single most common mistake we see on homeowner-supplied numbers.
2. Measure the height, three times
Measure from the sill (the bottom horizontal surface) up to the head jamb (the top). Take it at the left side, the center, and the right side.
If you’re unsure which part is which, our complete guide to window anatomy labels every component with a diagram.
3. Use the smallest number
You now have three widths and three heights. Write down the smallest of each.
This isn’t a rounding convention, it’s physics. A new unit has to pass through the tightest point of the opening. Gaps get shimmed and insulated; a unit that’s a quarter inch too wide gets sent back. For the same reason, round down to the nearest 1/8 inch, never up.
4. Measure the depth
Measure from the interior stop to the exterior stop. This is the depth of the pocket the window sits in. Once you have width, height and depth, you can check your numbers against our standard window sizes guide to see whether the opening lands near a stock size or will need a custom unit. Most insert or pocket replacement windows need roughly 3 1/4 inches of usable depth. Shallow pockets are common in older aluminum-framed windows and they change which products are available to you.
5. Check whether the opening is square
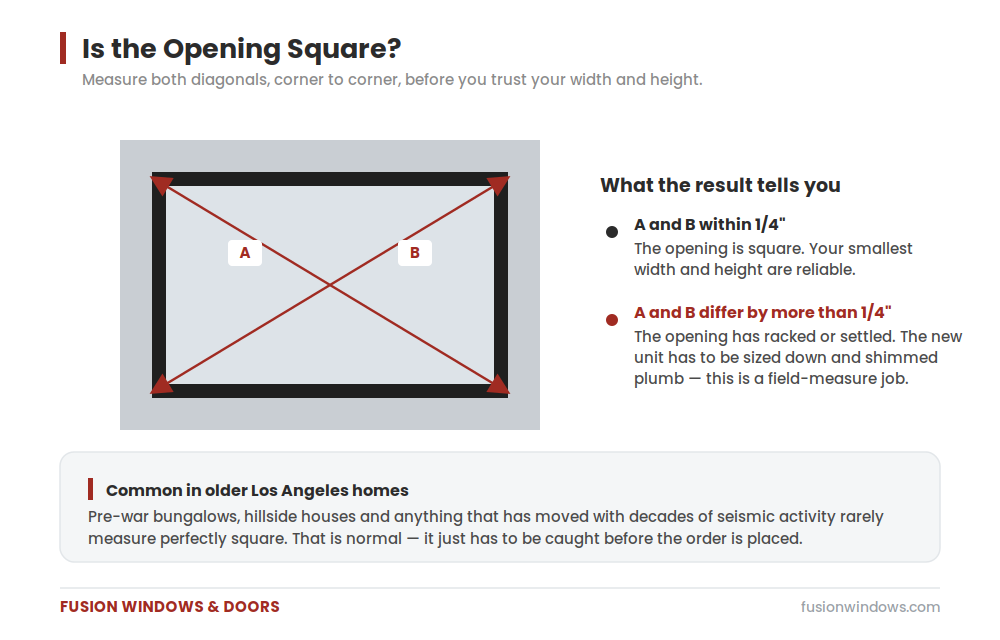
Run your tape corner to corner, one diagonal, then the other. If the two numbers are within about 1/4 inch, the opening is square and your measurements are trustworthy.
If they’re further apart than that, the opening has racked. This is extremely common in pre-war homes in Pasadena and Altadena, in hillside houses, and in anything that’s moved through a few decades of Southern California seismic activity. An out-of-square opening isn’t a problem. It just means the new unit has to be ordered undersized so it can be shimmed plumb, and that’s a judgment call for a field measure rather than a tape measure.
A note on bedrooms and egress
If you’re replacing a bedroom window, size isn’t only about fit. California’s residential code requires sleeping rooms to have an emergency escape opening that meets minimum clear dimensions. “Clear” means the actual open space once the sash is operating, which is always smaller than the frame. A retrofit insert eats into that opening, so a window that passed before may not pass afterward.
This trips up more remodels than any other code issue. Our egress window page covers the requirements, and it’s worth flagging any bedroom opening to us early.
How to measure for replacement doors
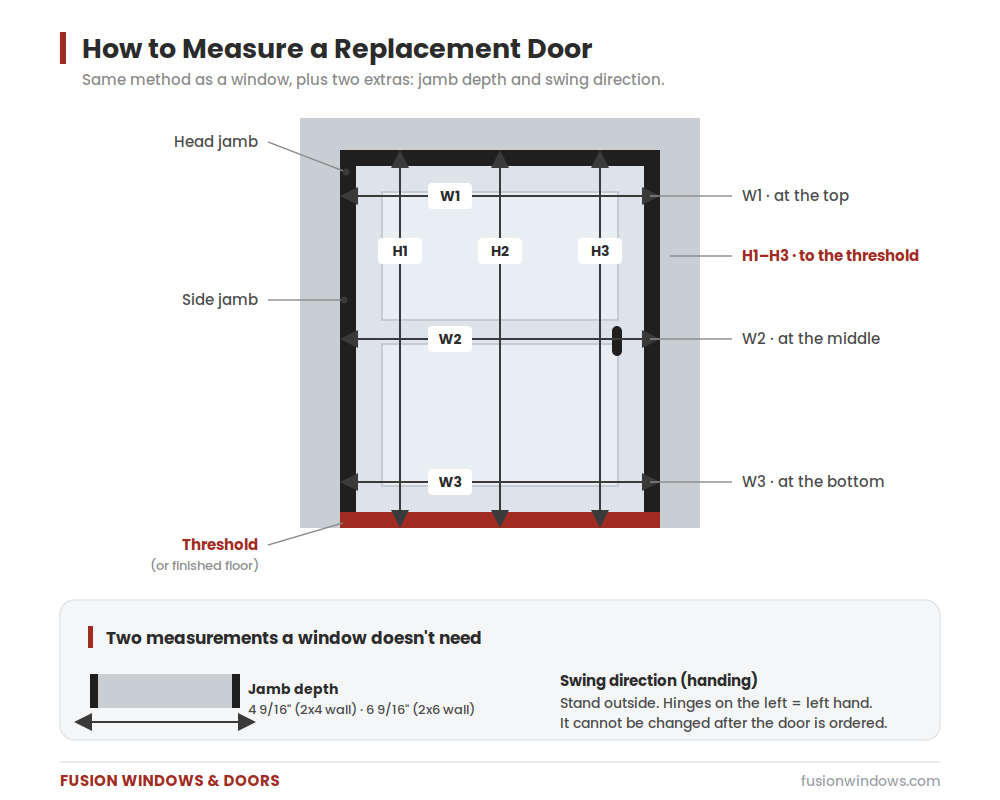
The method is the same as for windows, with two additions. Three widths, three heights, and the smallest number wins. This applies to exterior doors and interior doors alike.
1. Width and height
Measure jamb to jamb for width, at top, middle and bottom. For height, measure from the threshold (or the finished floor, if there’s no threshold) up to the head jamb, at the left, center and right.
Take the smallest of each, exactly as with windows. The parts of a door guide has a labeled diagram if the terminology is unfamiliar.
2. Jamb depth
This is the one people forget. Measure the depth of the jamb, from the interior edge to the exterior edge, through the wall. Standard is 4 9/16 inches for a 2×4 wall and 6 9/16 inches for a 2×6 wall, but plaster homes and stucco assemblies vary, and a jamb that’s too shallow or too deep means trim that doesn’t sit flat.
3. Swing direction (handing)
Stand outside the door, on the side it swings away from you, and look at the hinges. Hinges on the left is a left-hand door. Hinges on the right is a right-hand door. If the door swings toward you from that position, it’s left-hand reverse or right-hand reverse.
Handing cannot be changed after ordering. Outswing doors need a different sill and different weatherstripping than inswing, so this has to be right the first time. If you’re still choosing the door itself, selecting the best doors for your home works through the decision opening by opening.
Sliding and French patio doors
Measure the entire opening, not one panel. A three-panel slider is ordered as a single unit at its full width, and you also need to specify the configuration: which panel moves and which direction it slides.
Also check the floor. Sliding door tracks need a reasonably flat run, and a dip across a wide opening affects both the product choice and the installation. If you’re still weighing options for a patio opening, French doors vs. sliding doors compares them on cost, space and operation.
Interior doors
Interior openings follow the same width-and-height process, but the answer usually maps to a standard size: 24, 28, 30, 32 or 36 inches wide by 80 inches tall. Our standard door sizes guide has the full breakdown, and if you’re specifying a closet or pantry bifold, bifold door sizes explains why the number on the box isn’t the width of the opening.
Retrofit or full-frame? It changes what you’re measuring
There are two ways to replace a window, and they produce different numbers from the same opening.
Retrofit / insert replacement. The existing frame stays; the new unit fits inside it. You measure the existing frame opening. Faster, cheaper, and no stucco work. The trade-off is that you lose an inch or so of glass on each side, which matters for egress and for narrow windows.
Full-frame replacement. The old frame comes out down to the studs. You measure the rough opening. More labor, and on a stucco home it means cutting and patching. In return you get the full opening back, you can change the window style, and any rot or water damage hidden behind the old frame gets found and fixed.
Which one is right depends on the condition of the existing frame, the age of the home, and whether you’re changing style or size. It also has a real effect on cost and schedule. See how long window replacement takes and our door installation cost guide for the ranges.
Common measuring mistakes we see
Measuring the glass instead of the opening. Covered above, and worth repeating. It’s the number one error.
Measuring the old window and assuming it fits. The old unit may have been installed out of level, cut down on site, or replaced once already with something undersized. The opening is the truth; the old window is just a previous answer to it.
Taking one measurement instead of three. A single width taken at the middle will miss a bow in the jamb entirely.
Rounding up. Round down. Always.
Assuming identical windows are identical. Two bedroom windows on the same wall, framed the same day in 1936, will still measure differently today. Measure every opening.
Reusing a neighbor’s numbers. Tract homes in the Santa Clarita Valley and the Valley were built to the same plans, but sixty years of settling, remodeling and re-stuccoing means openings drift apart.
Skipping the depth measurement on doors. Then discovering the jamb doesn’t reach the drywall.
How to record your measurements
Keep it in one simple format, one row per opening:
| Room / location | Type | Width (smallest) | Height (smallest) | Depth | Notes |
|---|---|---|---|---|---|
| Primary bedroom, north | Double hung | 34 1/8″ | 58 3/4″ | 3 1/2″ | Egress, check clear opening |
| Living room, west | Picture | 71 1/4″ | 47 1/2″ | 3 1/4″ | Diagonals off by 3/8″ |
| Kitchen, south | Slider | 47 3/4″ | 35 5/8″ | 3″ | Over sink |
| Front entry | Entry door | 35 7/8″ | 79 1/2″ | 4 9/16″ | Right hand inswing |
Photograph each opening straight-on from inside, plus one wide shot of the room. Photos catch things a number can’t: trim profiles, interior finish, obstructions, existing damage. They also let our team give you far better guidance before anyone visits.
What happens at your free in-home measure
Your numbers get you an accurate estimate and let us narrow the product options. They are not what we order from.
Before any order is placed, a Fusion product specialist measures every opening on site: width, height, depth, diagonals, sill condition, jamb depth, wall assembly, and whether the framing behind the finish is sound. That’s also when we catch the things that don’t show up on a tape measure: dry rot under a sill, a header that’s settled, stucco that will need patching, an opening that needs reframing to meet egress.
That measure is free and carries no obligation. It’s also the point at which the responsibility for the numbers becomes ours rather than yours, which is the way it should be.
We handle it with our own licensed, in-house crews, never subcontractors, across Los Angeles, Burbank, Glendale, Pasadena and the surrounding communities, as an authorized dealer for Milgard, Marvin, Andersen, Fleetwood and others. You can see the full range on our windows and doors pages, or read more about our installation services.
If your opening doesn’t match anything standard, that’s routine. We build custom windows to size regularly, particularly on historic homes and post-fire rebuilds.
Get a free quote or call (818) 245-8484 and we’ll take it from your numbers.
Frequently Asked Questions
Do I measure from the inside or the outside?
Inside. Interior measurements are what manufacturers build to, and they’re more accurate and much easier to take than exterior ones.
Why three measurements instead of one?
Because openings are rarely perfectly rectangular. Three widths and three heights reveal bows, racking and settling that a single measurement hides.
Should I round up or down?
Down, to the nearest 1/8 inch. Gaps can be shimmed and insulated. A unit that’s too large cannot be made smaller.
What if my measurements aren’t perfect?
They don’t need to be. Homeowner measurements are for quoting and product selection. Every Fusion order is confirmed by a professional field measure before it’s placed.
Do I measure the rough opening or the existing frame?
The existing frame for a retrofit or insert replacement; the rough opening for a full-frame replacement. If you’re not sure which route you’re taking, measure the existing frame and note that you haven’t removed any trim.
Does the same method work for interior doors?
Yes. Three widths, three heights, smallest number wins. Add jamb depth and swing direction. See standard door sizes for what your numbers should map to.
How do I know if my opening is square?
Measure both diagonals corner to corner. Within about 1/4 inch of each other means square. Further apart means the opening has racked and the replacement needs to be sized down and shimmed plumb.
Can I change the size of the opening?
Yes, but it becomes framing work rather than a straight replacement: new header, possible permit, and stucco or siding patching. It’s a common request when a bedroom window needs to meet egress or a homeowner wants a larger patio opening. Worth raising at the estimate stage.